How to make a model kit of Bedford QL truck Bedford QL Refueller made by IBG in 1:35 scale
General utility trucks Bedford QL were true workhorses of the British Army during the WWII. Between 1941-45 about 52 000 of them were made!
This vehicle were made in an impressive number of variants. From the standard ones like typical army trucks through specialized artillery tractors, radio trucks, command cars to oil tankers.
Such Bedford QL in an aircraft refueller variant with three fuel booms will be a hero of this entry!
Well known model brand IBG have been releasing different variants of the Bedford QL trucks model family. Their newest product is this variant. When I saw the box on the shelf of my favourite model shop, I knew I must have it in my collection! Manufacturer offers two painting variants of this truck. First is a standard one, second - a definitely more attractive blue with a yellow roof from the 1950's. And that's the one I wanted to put in my display case!
So, how did building of this kit go?
Let's find out!
Works begun from painting the cab. I chose an olive colour, because I assumed that what ended as a colourful airport vehicle, started as a typical Army truck.

Cabin details were painted with superb AK Interactive 3rd generation acrylic paints. I also add some earth toned pigments on the cab floor to imitate accumulated dirt.

Next was the truck's frame. Unfortunately moulds start showing some wear so a file and putty was required. Parts don't fit as well as they should.

After that I decided to assembly the inner parts of the tanker. For painting I also used AK acrylic paints. Unlike the frame though - fitting in this section was very good.

Of course before closing the halves of the tank, I had to properly weather and wear those parts. I used washes and pigments from AK Interactive.

On photographs of trucks that survived in collections and museums I noticed, that a cover on the front grille was often used. I liked that details, especially that the kit's element moulded as a one piece with the whole front plate didn't look too good. So I made such cover out of Milliput.

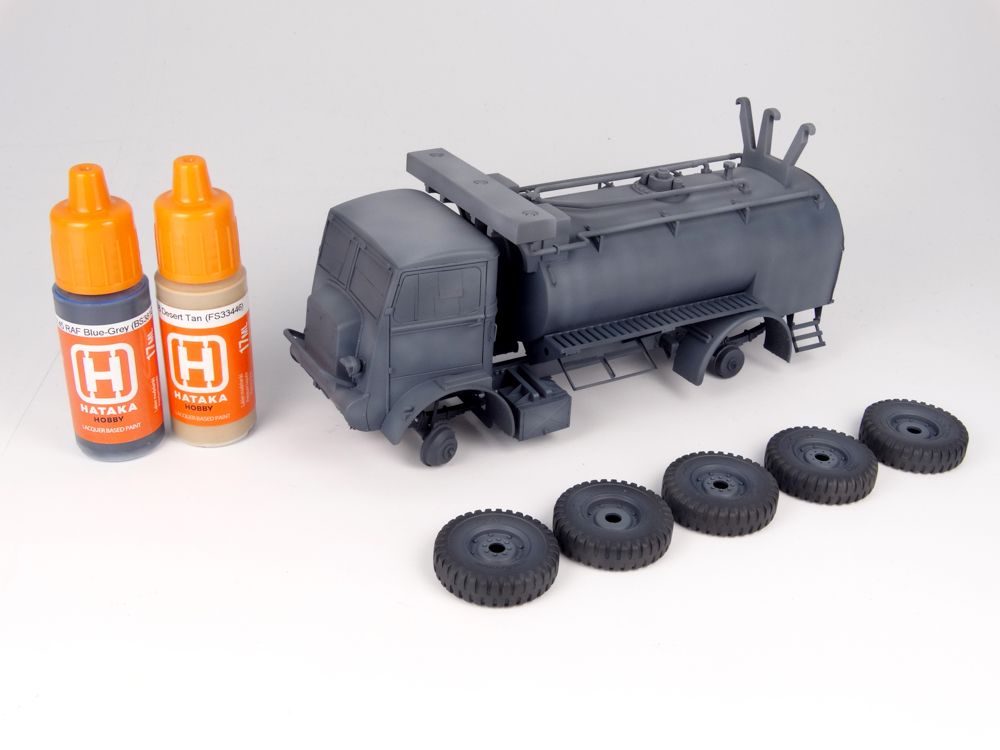
Thus the prepared miniature was ready for painting! First, I primed the whole kit with Vallejo surface primer in Panzergrau colour. I successfully use this type of primer in works for years.

Next, I lightened up the surface with light-grey Tamiya paint. I tried to spray only from above, so that the lower pars of Bedford would remain dark gray, so they could be used as shadows in further colouring process.

First main colour was RAF Blue-gray from Hataka, which I then selectively lightened with Desert Tan colour from the same producer. It was my first attempt in using those paints and I must say - they sprayed really well!
I then masked the required model surfaces with Tamiya masking tape, protecting them from the next colour which is...

…bright yellow! A very lively, intensive yellow was chosem from the AK Real Color series palette. I altered the final colour by adding white to the mix.

IBG suggested that the tyres should be painted with white sides, well known from the parades. I cut out the masks using Olfa circle cutter and then I painted them white.

Using light blue AK Weathering Pencil I made some spots of faded paint. I feathered small lines using paintbrush moistened with water.

I sealed the whole model with a gloss varnish and applied the decals. I further treated them with Micro Set i Sol.
decal softening solution.

Time has come for some "heavy" weathering. First step was to apply some pin wash, which was done using Sepia oil paint from 502 Abteilung diluted with odourless turpentine.

Next acrylic paints were used to make chipping of the base colour, which would become a good base for further damaging the paint. Scrathes were painted using a fine paintbrush and a piece of sponge held by a self closing tweezers.

Ready, light chips were filled with dark brown paint, imitating damage "to the bare metal".

Works on the dusting of the lower part of the body started by spraying a light-beige enamel from AK...

…which I almost immediately feathered using paintbrush moistened in turpentine, thus making realistic dirt dtreaks.

To make imitations of fuel streaks and stains on the tank, I applied several coats of Engine Oil enamel, which again, I blended with White Spirit. This made for a good base for further streaks.

Aforementioned heavy streaks of fuel were painted on using oil paints Engine Grease and Bitume by 502 Abteilung. I used turpentine to blend them.

Similar technique was used to paint some fuel stains on the Bedford's own fuel tank, but this time I added some Vallejo Carbon Black pigment, to imitate some dirt deposits stained with fuel.

By looking at the reference photographs, I noticed that the airfield Bedfors had installed rear lights and reflective plates. Unfortunately they were omitted by the manufacturer. I cut them out of the styrene, painted and finished using Tamiya clear paints.

Time for painting wheels. First of all - I wiped the white stripe on the tyres, so it was barely visible. Then I painted the tread using an AK Interactive Deposit paint and while it was wet I pushed some more earthly oloured pigment into it.

IBG also forgot to recreate windscreen wipers, so I had to make them as well, but first I marked their passing area with masking tape.

I made the wipers out of some wire and strene. The unmasked parts of the windscreen was weathered with sand coloured enamel colour.

On the period photographs I also noticed that oftentimes the fuel lines were reinforced with wire. I liked this idea, so I made them out of some electrical and tin wire.

Here's a small comparison of the two - new lines fitted to the truck and next to it - those supplied with the kit...

Using a metallic paint from the AK True Metal line, I gently passed through all the surfaces and raised places where some fresh paint scuffs and chips might have occured.

Last step was to imitate some rust on the edges of the rear doors. I also used an AK Interactive enamel from the Deposit line.

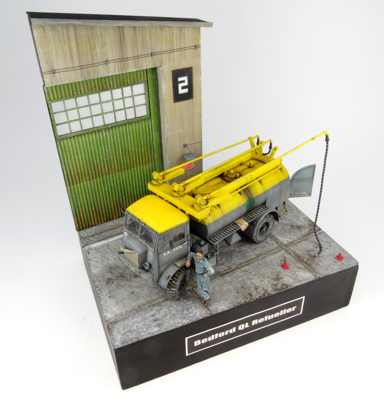
and that's how the finished model looks:


If not for my personal rule, that every model kit has to have some scenic base, I might have considered this project finished... So, where does an airfield Bedford would look best if not on an airfield? Let's made one then!
From styrofoam, cardboard and balsa wood I cout out a piece of an aircraft hangar. I made the doors out of cardboard and the airfield strip was made out of some cork. Everything was covered with acrylic putty.

I painted the base with acrylic paints from different brands. I thought that the green doors would make a nice contrast with a yellow-blue vehicle.

All parts of "rust" weathering was done using AK weathering pencils.

I used NOCH static grass and some real plant parts to create small grass tufts and other foliage. All of this was secured with AK Gravel&Sand glue.

For making dust around the building and between the concrete slabs, I used some earthly coloure pigments.

After touching up some places with weathering pencils, this is how the finished base looks:

And this is how a very interesting and eye-catching model kit of an airfield tanker made its way onto my display!
Witold Socha


Rob Clare
Absolutely breathtaking. I'm just building the Airfix Refuelling set and your incredible artwork is intimidating but also an incentive for me to learn. Thank you so much