
„Bad Day – Beginning”
Schwerer Panzerspähwagen (Artilleriewagen) – DML 6073 1:35
Crew of a German heavy armoured train scout car - Schwerer Panzerspähwagen (Artilleriewagen) – stopped for a while ona wooden bridge over some river to catch some breath and rest from the cramped and stifling interior also to check the direction they're going. Fate has it, that right under their feet a Soviet partisan have just finished placing the demolition charges... Yes, this day is not going to be good.
This is an idea that came to my mind when I picked up from the shelf a model of the Dragon's armoured train car which I built some time ago, but didn't get to paint and finish it. Kit itself is not new, though it still holds up to today's modelling standards. Assembly wasn't a problem - only some details has to be added. So having the star of this vignette ready I could move on the main part of the works!
How did they go?
Let's see!
1) Works begun by replacing all of the plastic grab handles for ones made out of copper wire. I also modified clamps for the pioneer tools.

2) I started painting by spraying a Vallejo Panzer Grey primer, which I then highlighted selectively using Tamiya white paint. This will help in subsequent painting with Dunkelgelb colour from AK Interactive RC paints. As I have observed, those paints behave much better and are easier to lay down on a lightly coloured surfaces.

3) And here's mentioned Dunkelgelb fromAK Interactive's Real Colors – its darker variant i.e. Nach Muster RC059

4) Next I made some light post shading using a mix of paints. With this brown-red shade I accentuated all edges and details of the miniature.

5) Final step of working on the base Dunkelgelb colour was to spray a delicate mist of RC060 Dunkelgelb paint, which I have highlighted in places adding a few drops of Pale Sand RC018 to the base colour.

6) Soft irregular camouflage was painted using Spanih Green colour - also from AK Real Color paint slightly lithened with Pale Sand. I always lighten up the base colours in my works because at the weathering stage model always gets darker.

7) I painted the remaining details using 3rd generation acrylic paints from AK Interactive.

8) It then came to making some chipping. Obviously an armoured train is not going to have the same kind of chipping as a frontline tank but to leave them out completely... it'll be looking strangely empty! I made a light base for chipping using a brush and a sponge with an Ice Yellow paint...

9) … and after it dried I filled them with a Grime Brown colour. All chippings gained some depth.

10) To bring out all of the details I made a pin wash. For this an Industrial Earth oil paint from 502 Abteilung was thinned down. This is a very nice grey-brown colour that I consider perfect for light, sandy or yellow colours!

11) Fading is an absolute must do in AFV models! Here I did a classic dotting technique i.e. small dots of different colours of oil paints was applied on the model's surface...

12) … and using a brush lightly moistened in proper thinner I blended them in circular motions.

13) I did similar thing on the vertical surfaces, but there I blended them from top to bottom, which also created some interesting streaks on the train's sides.

14) For imitating rust on the mufflers I used the ever dependable Lifecolor Dust & Rust set.

15) Using Raw Umber I added some fake shadows, which put some emphasis on the selected edges.

16) I added some rust to the paint chippings which I blended using brush with some thinner. This was another step in giving the chippings some more depth.

17) I finished painting the tools, buffers and gun barrel. This step was also accomplished using 3rd generation acrylic paints.

18) To imitate dust on the lower portion of the vehicle I used the following technique: first I covered the model with a layer of hairspray and on top of it I sprayed an earthly coloured Tamiya paints, mix

19) …and after a while I activated the surface with water and using a stiff brush I scraped off the paint to create irregular and interesting dust streaks and deposits.

20) For the final finishing steps of the surface I used enamels from Deposit line from AK Interactive. I spattered the surface with small droplets stroking the brush with a toothpick.

21) Upper surfaces of the train has also to be dusted a little, crew was moving on those parts all in all. Here I used earth coloured pigments from AK Interactive.

22) As the surface treated in such way was too monotonous, I added some effects of rust stains and some oil spills made using enamel products Rust Streaks i Engine Oil.

23) Finishing touch was adding some soot on the exhaust pipes. I did it using Carbon Black pigment from Vallejo.

24) So, my scene tells a story and a story needs actors! German crew are figures from Glowel Miniatures and Soviet partisan comes from an ICM set. All of them were painted using AK Interactive's 3rd generation acrylics. I also made some explosives using Plastruct profiles, which I put in a crate from MiniArt. Out of the HIPS sheet I made a reel for the fuse.

25) As is well known - each my model kit HAS to have a base and this one is no exception. I started building from the stonework bridgehead. To get a proper texture of stone bricks I pressed a real rock into the foam to get a nice, irregular yet realistic pattern.

26) Rest of the base was made from styrofoam and XPS. I finished the sides using balsa wood.

27) Wooden span and pylon were made from pinewood slats bought in a DIY shop. Before fixing, I primed them with a brown woodstain to make further painting easier.

28) I weathered the wood using acrylic paints and great Weathering Pencils.
29) I attached the pylon to the base and made the groundwork from a tile glue on which I poured some flower soil and rocks in different sizes. Everything was ther primed and unified with a building priming liquid.

30) I dry fit the span to the bridge and glued it in and then I cut the set's rails to a proper length.

31) Using Tamiya paints I added some colours to the river bed and ground around…

32) …which I detailed up with acrylic paints. I also shaded the stone bridgehead.

33) Further works included adding small chips and stone damage as well as streaks of dirt with an oil paints.

34) Areas near rivers always have lush foliage so I made it out of Noch products aimed at railway modellers and added some Bear Scale small bushes.

35) Remaining parts of foliage was made from small plants parts, dried herbs and spices and a little bit of sand.

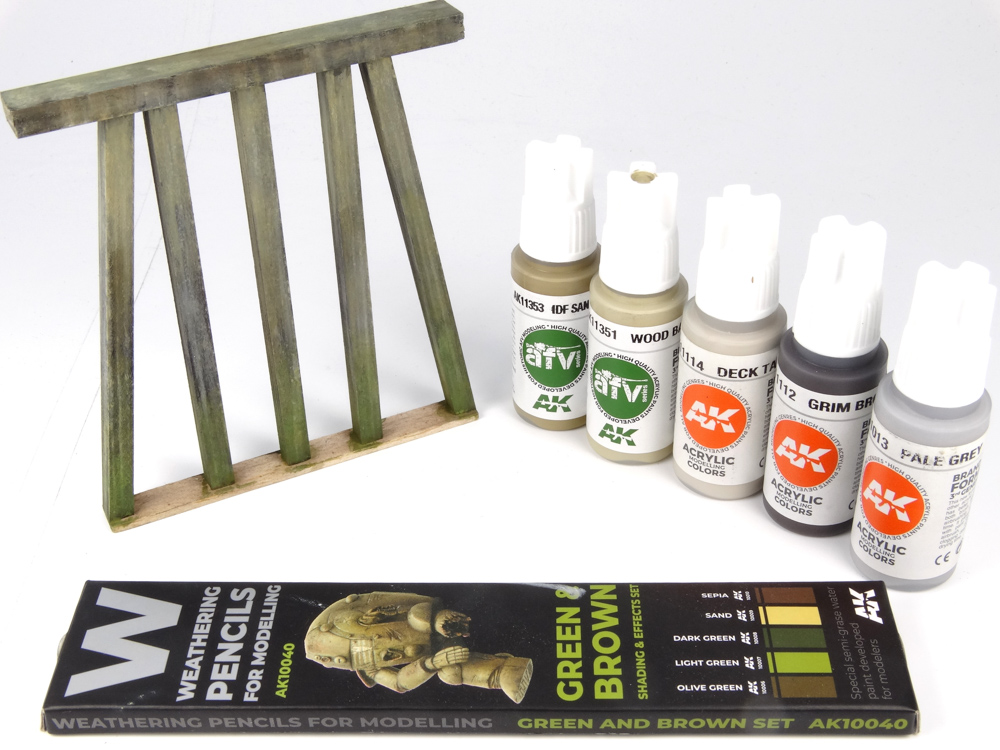
36) Final step was to add some earth coloured AK Interactive pigments, which unified the colours and overall look of the ground.

37) If there's a river, there has to be water in it and to recreate it in scale there is nothing like epoxy resin. First I had to construct some framework, so no resin would flow out of the pouring place.

38) I mixed the resin according to the manufacturer's instructions in 2:1 ratio and add some colour usin grey-blue Vallejo acrylic paint.

39) The the mix was carefully poured into the riverbed and left for 24 hours to cure. The next day I was able to remove the cardboard framework.

40) As the river is a moving body of water - there had to be some small waves. I used Vallejo's Water Effects medium applied with a silicone brush on a fully hardened resin surface. When dry they became fully transparent.

41) I used the time when the water cured to paint and weather the railway. To acheive this I used the pictured paints, enamel and oil paints.

42) I attached the explosives to the pylon.

43) Before attaching the span with rails I placed the partisan and all the cables to make this task easier.

44) Final step was to glue, using Gravel & Sand glue a fallen tree made by Freon, placing the train car with the crew and…
it was done :-)

My collection was expanded with another interesting model in an unconventional scenery:

Feel free to see the gallery of the finished model!
„A Bad Day – Beginning” diorama gallery
Witold Socha

