In this installment of our blog there is something for fans of Polish aviation!
Piotr Słomiński, a well known and respected modeller, has agreed to make for us the icon and pride of our aviation - the PZL P.11c in 1/48 scale from Arma Hobby.
What techniques he used and how the build itself went - you will find out in this article!
And after reading, be sure to see the gallery of the finished model!
The model that the Exito team and I chose to present in this article is not the most recent, but at the time of its release it caused quite a stir in the modeling world.
Probably most Polish (and not only) have built a model, of this much-loved PZL P.11c.
Arma Hobby gave us the opportunity to build it in 1/48 scale. Of course the model of this machine was already available on the market in this scale, but this article is not about comparing them.
We decided that this model will be build almost straight out of the box adding only an oil cooler, gun barrels and other details made by Master and an instrument panel made by Yahu. I chose those detail sets as they are a straight replacement of plastic parts or requite only drilling some holes in proper diameter - and this is something even beginner can do while improving the look of the model kit by a large margin.
Of course - you can make out of this set "the model of your life" by doing more conversions and improvements and using a plethora of aftermarket detail set available.
But our aim is to make this article accessible so that every modeller can build their own "P-Eleven" drawing inspiration and some guidance from it.

It's time for the first cut!
.
I'm following the instructions i.e. I start with all the elements of the cockpit. I have a habit of preparing a set of elements in a given section or module beforehand so that when I start painting, I can paint as many of them as possible in one go with the airbrush.


When the parts were ready, I was able to start my first paint jobs. I began by applying a delicate black preshading to the parts.
.

As the surface was ready I started to apply the main cockpit colour. Matt silver is the proper one and I'm using Hataka C003 from a paint set for Polish aviation „September 1939”. Paints from the same set were also used to colour the lower and upper surfaces of the model.

After the paint dried I could paint smaller details inside as an oxygen bottle, control stick or leather seat cushions.


I painted leather by base coating the elements with a light rusty brown, then using a dark brown paint and a cut brush I tapped it onto the surface. To finish it up I made some bright stress marks using a light beige colour and a drybrushing technique.

Photoetched seatbelts were painted in a colour I deemed appropriate for them and glued to the seat.


I glued together some parts and all were protected using a matt varnish Mr.Color GX 114.


It was now time for applying some wash to emphasise the structire of the cockpit. For this I used AmmoMig 1003 - Interior Wash.

I cleaned the excess using some cotton buds so the wash remained only where I wanted it to be.


All was left to do are some earth dirt marks on the cockpit's floor and it can be glued into the fuselage. For this I used Tamiya weathering sticks: Light Earth and Sand. I applied them using a brush.


Parts fit into the fuselage nicely and the other half also had a perfect fit.


I put aside the fuselage for the joint to properly dry. During that time I decided to prepare all of the engine parts.

Not a lot of cleaning up here, though I admit that the sprue connectors are quite large. The whole engine section was painted with colours indicated in the instructions using also some photographs as a reference material. First - black base.

Now each part was painted in a proper colour.
I started with Hataka C003.

Next I painted the elements that are in the main camouflage colour. Here I used Hataka C010 Dark Polish Khaki.

It was then time for painting the engine. Cylinders and main body were dry brushed with silver.


I made some wires out of the thin tin wire.


Exhaust manifolds were painted black and then using highly diluted rusty colours from Lifecolor I made some slight colour filter.


Now I could glue it all together.

Next step was to seal it using Mr.color GX 114 matt varnish.

Visible cylinder heads were lightly washed usingAK-interactive 082 Engine Grime

I applied some Ammo Mig Green Brown 1612 into the engine cover recesses


I wanted the ring to look like burnt metal. To achieve this effect I used three paints from Alclad II palette: Burnt iron – 121; Jet exhaust – 113 and Pale burnt metal - 104.
I started by spraying Pale burnt metal.

Then slightly sprayed some Jet exhaust colour

And finished with a touch of burnt iron. I liked the effect and considered the ring finished.

Now it was time to return to work on the fuselage. I cleaned up the seam between the two parts of the fuselage.
I did it using scalpel and a fine sandpaper. For final polish of the surface I used some steel wool.

To rescribe some of the sanded down panel lines I used the so called „razorblade saw”.

I added some smaller details and photoetched parts and glued in the fuel tank.


Then it was time to prepare parts for the elevons and rudder.


Next step shown in the instructions is glueing the rear skid and elevons supports. I cleaned up the required parts. Skid was glued right away but the struts will wait until later - it will be easier to paint the model that way.

I also did this with the engine's cowling - I glued the halves together but didn't attach it to the manifold. Doing it later will make it all easier to paint.


And I arrived at the step requiring me to glue in the landing gear struts. When you clean them up and glue - spend a while, before the glue dries, to position them correctly and check their geometry. Instruction features a drawing that will help in this matter.


If we're making landing gear - we also have to do wheels. I painted them now and left to glue them at a later time. For tyres, I used Mr.Color C137 Tire Black which was also used to prime the hubcaps.


After masking the tires with masks included in the set I painted the hubcaps with a proper Hataka C010 Dark Polish Khaki. Additionally - I applied to the side decals with the maker's name and size. Weathering will be done later on.


I moved on to making the distinct gullwing. Icut out and cleaned up both halves. You have to be very careful while doing this because the sprue gate is quite big and on the very thin edge of the part and thus it's easy to damage it. It's best to cut them a little further from the part and sand down the remaining sprue gate using a file or fine sandpaper - this way you won't damage the fragile edge.

Then I glued the halves together. You have to note whether machine you are building had the wing guns installed or not. If not - the holes for them have to be filled up. I did this using some CA glue.


I applied surfacer 500 in some place where the halves meet. Seam and the blinded off MG ports were sanded smooth using a Proxxon mini sander, fine sandpaper and steel wool.


Done. Some smaller details that come under the wings will be glued later. I know from experience, that they are always breaking off during the construction...


I cleaned up the main wing struts, but I'll glue them after painting the model.

All that was left was to clean up and prepare the propeller, hub and I could slowly get to painting the whole thing.

I started with lower surfaces that are going to be painted Light Blue-Gray C036 from Hataka. To make the overall effect more visually interesting before spraying the main colour, I did some shadows and highlights using white Mr.Color C062 and grey Mr.Color C333.


On the "checkerboard" that came out of it I applied a grid of preshading using Mr.Color C116.

Then I sprayed the surface with the main colour. I applied it in a thin layer so as not to cover the previous effects completely.


After masking off the already painted lower sides I start applying Khaki colour.

I made it similar way as with light blue: first I applied Mr.Color C044 and Mr.Color C369on selected panels.


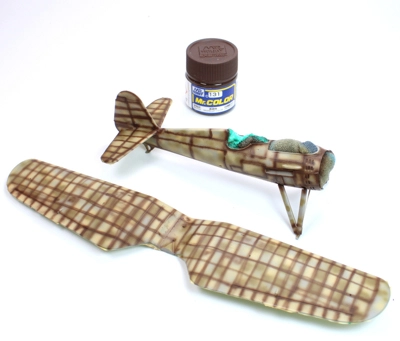
To make a preshading I used this time Mr.Color C131.

And it was finally time for the base colour that is C010 Dark Polish Khaki from Hataka.


Main modules were painted in their proper colours so I could glue them together. I must say that glueing the wing with the fuselage is absolutely hassle free. You just need to check the geometry before the glue dries - but it's a purely cosmetic thing to do.


Virtually all main parts were glued together so I painted the whole model with a Mr.Color C046 gloss varnish. This is a step that will allow me to apply the decals and various weathering techniques much easier.

To apply the decals correctly I used Microscale products. Under decals I applied SET and over decals to soften them SOL.

Decals applied very well, though because of the very textured surface imitating special sheet covering on this aircraft - if you are more experienced modelled I would suggest using painting masks for the checkerboards. It would probably give a slightly better effect but by no means I'm saying that the decals are bad!.


After the decals were fully dried, I sealed them using Mr.Color C046 clear gloss.

I could now start applying washes.
To the lower surfaces I applied Ammo Mig Panel Line Wash 1619 Blue Dirt.
After it dried a bit I wiped off the excess using cotton buds.


The same was done on the upper surfaces, this time using Ammo Mig 1618 Deep Brown...

…which I wiped off using cotton buds too.

Now it was the time to glue all the remaining small details that were left out to avoid damaging them. I attached the oil cooler that I replaced with a wonderfully printed Master part.


I also replaced the plastic machine guns with metal ones - also did by Master.

First - I painted them black…

...and then dry brushed a bit using silver paint.

I also replaced the Venturi probe,


along with gun sights.

Now all the smallest details were in place.
Model was sprayed using matt varnish Mr.Color GX 114.


Earlier - while washes were drying up - I started working on the windshield.

After some cleanup I masked it using the included painting masks...

...and painted in the base colour. I will glue it to the fuselage at the end of the build.

Using earth coloured pigments and a brush I applied some dirt marks here and there. The effect was subtle as pictures didn't show any heavily weathered P.11c - apart from wrecks.


Black pigment was used to make some exhaust stains.

All that was left to do was the very distinct antenna wiring. To make them I used some great USCHI rigging thread.

Model was finished!

I consider the PZL P.11c kit from Arma Hobby in scale 1/48 is a great model that if made out of the box has all the qualities to be a centrepiece of our collection.
Maybe there are not a lot of parts, but this makes it within reach of less experienced model builders. Great fit of the parts makes it a very smooth and relaxing experience. Of course - more demanding and experienced modellers can use a wide array of aftermarket detail sets and even some scratchbuilding. Then they may transform this kit into a real gem that can easily become an "award hunter" at model shows!
Piotr Słomiński
P.11c made by Piotr can be seen in more details in finished model gallery!


Mariusz M
looks good :)